 Wired Wood
Guitars
Wired Wood
Guitars
![]()
![]()
|
|
|
Building Yendor
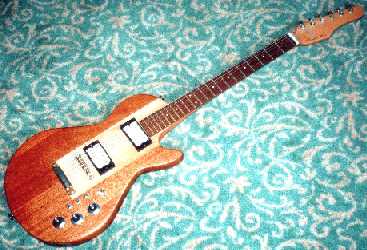
Why build a guitar?As a sixteen year old schoolboy I had an interest in music and had started to learn to play guitar. It was hard going with a cheap acoustic guitar. I had tried a friends electric guitar, and found it much easier to play. My family couldn't afford one. Then my headmaster stepped in. He decided that the boys in the sixth form would not spend the next two years with their heads in books. He resolved to make us do something practical and marched us over to the technical wing. Here the woodwork and metalwork teachers were tasked with getting each of us to do a practical project. We all started something, but within a month everybody except me had dropped out. My project carried on for two years in parallel with my A level studies. The result is the guitar you see here. The designSpecification
The starting point was an article in a woodworking magazine for a simple "flying V" type guitar with a plywood body and a bolt on neck. Not very good really. The only thing I used from this was the overall neck dimensions and fret positions. This was 20 years ago, before the advent of the WWW, so I had little other information. I studied as many guitars as I could and perused catalogues in detail. I based the body shape loosely on the Gibson Les Paul. The headstock owes more than a nod to the Fender Telecaster. I wanted a through-neck rather than a bolt-on, both for aesthetic and sustain reasons. The all over natural wood look is to my eyes very smart, so I avoided having a scratch plate. I did not particularly want a tremelo arm. I thought this would add un-necessary complication, so I went with a Gibson style tune-o-matic bridge and tailpiece. As I wanted a natural wood finish, the colour was dictated by the available materials in the school workshop. ConstructionWork started with the neck. This was shaped from a single piece of beech, kindly donated by a friend's father. This was the key component in the guitar. The overall shape was marked out in pencil, based on the dimensions from the woodwork magazine article. Rough cutting out was done on the school bench saw. The next stage involved hours of laborious work with a spoke shave, rasp and sandpaper to get the neck profile right. The fret board was a piece of rosewood from school stock glued to the neck and planed flat. Curvature was then introduced using sandpaper wrapped around a block. Fret positions were carefully marked, then cut with a fine razor saw. Before the frets were fitted the position markers were added. These are lengths of plastic, cut from a large knitting needle and glued into holes drilled in the neck. When planed flat their origin is concealed. Frets are made from commercially available fret wire, cut to just over length then forced into the approporiate saw cut in the fret board with a light hammer and a block of wood. When in place the frets must be filed and sanded with wet and dry paper until smooth and level.
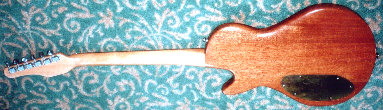
The body is seeing it's second lease of life as a musical instrument, being made from a school piano! Before you get visions of Les Paul shaped holes in the side of the upright at assembly, I must emphasise that the piano had long since been de-commissioned and stripped for useful material by the woodwork teacher.
The "bottom" piece had an oval hole cut into it, which would form the recess for the electrics. This only gave a cavity half the depth of the body. I needed to achieve a wood thickness of only about 1/8 inch where the controls poked through the body. This was achieved by drilling small pilot holes from the front of the guitar where the controls (pots, switches) needed to be. I then turned the wood over and, using the pilot holes as a guide, drilled most of the way through the wood with a new sharp wide wood bit. This was done on a bench drill so that the depth of drill could be safely controlled using the drills adjustable stops. The neck and both halves of the body were glued with Resin W and firmly clamped together over a weekend. Then followed another long session with the files, rasp and sand paper to shape the body so that it felt comfortable when held or worn. A key feature which took shape at this time was the smooth joint between the back of the neck and the body. FinishingI now had a complete and working guitar, but it is in bare wood. Time to take it apart. Everything has to come off. All the fittings, pick ups, machine heads, knobs, etc.
Prior to starting to apply the lacquer it is important to get the wood as smooth as possible. A trick here is to wet the wood to raise the grain, then sand it down while still wet. The key to obtaining a good finish is to apply multiple coats of lacquer and sand down with wet & dry paper between each coat. There is no short cut. Most guitars carry the makers name, mine is no exception. Lettraset was used to apply the legend Yendor Mk 1 on the head stock (read it backwards). This was done about half way through the lacquer coats, so that it benefited from the lacquer protection. Final finishing is achieved by smoothing the lacquer with a fine liquid abrasive, such as T-cut, then polishing with furniture polish. Post ScriptThe finished guitar is pleasing on the eye, plays reasonably well, and has an acceptable tone. It is certainly much better than anything I could have affoded to buy at the time. However, with the benefit of hindsight, if I was doing it again I would pay attention to the following points.
|
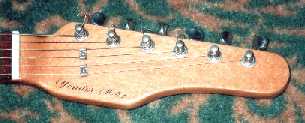 The machine heads and nut were fitted next. I used fairly good quality Schaller
machine heads. The nut is held in place by string tension. Two additional string
trees were added to hold the thinner strings close to the headstock and ensure
sufficient string pressure over the nut. With the addition of the bridge and
tailpiece I could actually string the guitar. At this point I had a
playable guitar, even though it had no body and wasn't very loud! The
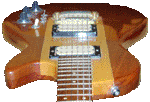
final job on the neck was to mark out and cut out the holes for two hum-bucker
pick ups.
The machine heads and nut were fitted next. I used fairly good quality Schaller
machine heads. The nut is held in place by string tension. Two additional string
trees were added to hold the thinner strings close to the headstock and ensure
sufficient string pressure over the nut. With the addition of the bridge and
tailpiece I could actually string the guitar. At this point I had a
playable guitar, even though it had no body and wasn't very loud! The
final job on the neck was to mark out and cut out the holes for two hum-bucker
pick ups. 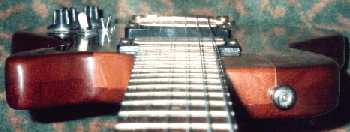 The body is a laminate of two pieces of mahogany to give the necessary
thickness. The two were cut out at the same time on a band saw. The "top" piece
then had the rectangular recess for the neck cut out carefully. The neck is
actually thicker than half of the body, so the "bottom" piece was recessed to
take the rest of the neck. This was done by careful work with a hammer and
chisel, checking the fit regularly. I didn't have access to a router, this being
a very exotic tool in the seventies!
The body is a laminate of two pieces of mahogany to give the necessary
thickness. The two were cut out at the same time on a band saw. The "top" piece
then had the rectangular recess for the neck cut out carefully. The neck is
actually thicker than half of the body, so the "bottom" piece was recessed to
take the rest of the neck. This was done by careful work with a hammer and
chisel, checking the fit regularly. I didn't have access to a router, this being
a very exotic tool in the seventies! 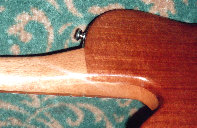 At first I tried a "Ronseal" type domestic varnish to protect the wood, but I
found that such varnishes are not hard enough for this application. I discovered
this the hard way and had to laboriously sand away all traces of the varnish.
The desired quality of finish was actually achieved by using a two part lacquer.
This comes with a hardener. When the two are mixed a chemical reaction starts
which culminates in a very hard surface, which can be polished to a mirror
finish.
At first I tried a "Ronseal" type domestic varnish to protect the wood, but I
found that such varnishes are not hard enough for this application. I discovered
this the hard way and had to laboriously sand away all traces of the varnish.
The desired quality of finish was actually achieved by using a two part lacquer.
This comes with a hardener. When the two are mixed a chemical reaction starts
which culminates in a very hard surface, which can be polished to a mirror
finish.